Welcome to GCP!
![]()
This guide explains how to set up Google Cloud Platform (GCP) to use PyTorch 1.0.0 and fastai 1.0.2. At the end of this tutorial you will be able to use both in a GPU-enabled Jupyter Notebook environment.
If you are returning to work and have previously completed the steps below, please go to the returning to work section.
Pricing
GCP charges separately for the base CPU platform, and the GPU. We have two recommended configurations, standard, and budget. Note that all prices assume you are using preemptible instances (see below for details).
Standard Compute
The base platform we suggest is called n1-highmem-8, and costs $0.10 per hour. Attaching a P100 GPU costs $0.43 per hour so both together amount to $0.53 per hour.
Budget Compute
If you have a tight budget you might want to go with a cheaper setup. In this case, we suggest a n1-highmem-4 instance ($0.05 per hour) with the same T4 GPU ($0.11 per hour), for a total of $0.16 per hour.
Storage
In both cases, by getting the suggested 200GB Standard Disk storage size (less storage hampers experience), there will be an additional charge of $8 a month. The same size in fast SSD storage costs $34 per month.
How much will you use this course
Considering that the course requires, over 2 months, 80 hours of homework plus the 2 hours of working through each lesson, we calculated roughly how much you would spend in the course with each of the setups.
- Standard Compute + Storage: (80+2*7)*$0.22 + $8*2 = $49.82
- Budget Compute + Storage: (80+2*7)*$0.165 + $8*2 = $31.51
Even if you were to work on the course twice the time that we suggest as minimum, your expenditure would amount to $99.64 which is less than 1/3 of the credits GCP gives you. Therefore we suggest to go for the Standard Compute option.
Step 1: Creating your account
Cloud computing allows users access to virtual CPU or GPU resources on an hourly rate, depending on the hardware configuration. Find more information in the Google Cloud Platform documentation. In case you don’t have a GCP account yet, you can create one here, which comes with $300 worth of usage credits for free.
Potential roadblock: Even though GCP provides a $300 initial credit, you must enable billing to use it. You can put a credit card or a bank account but the latter will take several days for the activation.
The project on which you are going to run the image needs to be linked with your billing account. For this navigate to the billing dashboard, click the ‘…’ menu and choose ‘change billing account’.
Step 2: Install Google CLI
To create then be able to connect to your instance, you’ll need to install Google Cloud’s command line interface (CLI) software from Google. For Windows user, we recommend that you use the Ubuntu terminal and follow the same instructions as Ubuntu users (see the link to learn how to paste into your terminal).
To install on Linux or Windows (in Ubuntu terminal), follow these four steps:
# Create environment variable for correct distribution
export CLOUD_SDK_REPO="cloud-sdk-$(lsb_release -c -s)"

# Add the Cloud SDK distribution URI as a package source
echo "deb http://packages.cloud.google.com/apt $CLOUD_SDK_REPO main" | sudo tee -a /etc/apt/sources.list.d/google-cloud-sdk.list

# Import the Google Cloud Platform public key
curl https://packages.cloud.google.com/apt/doc/apt-key.gpg | sudo apt-key add -

# Update the package list and install the Cloud SDK
sudo apt-get update && sudo apt-get install google-cloud-sdk
You can find more details on the installation process here
To install Google CLI on MacOS, in the terminal run
curl https://sdk.cloud.google.com | bash
exec -l $SHELL
In both cases, once the installation is done run this line
gcloud init
You should then be prompted with this message:
To continue, you must log in. Would you like to log in (Y/n)?
Type Y then copy the link and paste it to your browser. Choose the google account you used during step 1, click ‘Allow’ and you will get a confirmation code to copy and paste to your terminal.
Then, if you have more than one project (if already created on your GCP account), you’ll be prompted to choose one:
Pick cloud project to use:
 [1] [my-project-1]
 [2] [my-project-2]
 ...
 Please enter your numeric choice:
Just enter the number next to the project you created on step 1. If you just created your account it will likely have a generated random name for its Project ID. If you select the choice “Create a new project”, you will be reminded you also have to run “gcloud projects create my-project-3”.
In order to set a default region you’ll need to enable the Compute Engine API, the CLI will output a link you can follow to do this.
If you’ve enabled the Compute Engine API you’ll be asked if you want to choose a default region, choose us-west1-b if you don’t have any particular preference, as it will make the command to connect to this server easier.
You can modify this later with gcloud config set compute/zone NAME
Once this is done, you should see this message on your terminal:
Your Google Cloud SDK is configured and ready to use!

* Commands that require authentication will use [email protected] by default
* Commands will reference project `my-project-1` by default
Run `gcloud help config` to learn how to change individual settings

This gcloud configuration is called [default].
Step 3: Create an instance
To create the instance we recommend, just copy and paste the following command in your terminal. You can change $INSTANCE_NAME to any name you want for your instance.
If you choose the budget compute option, please replace the values of the parameters on the lines with a ‘budget:’ comment (e.g. replace “n1-highmem-8” by “n1-highmem-4”).
export IMAGE_FAMILY="pytorch-latest-gpu" # or "pytorch-latest-cpu" for non-GPU instances
export ZONE="us-central1-f"
export INSTANCE_NAME="my-fastai-instance"
export INSTANCE_TYPE="n1-highmem-8" # budget: "n1-highmem-4"

# budget: 'type=nvidia-tesla-t4,count=1'
gcloud compute instances create $INSTANCE_NAME \
        --zone=$ZONE \
        --image-family=$IMAGE_FAMILY \
        --image-project=deeplearning-platform-release \
        --maintenance-policy=TERMINATE \
        --accelerator="type=nvidia-tesla-p100,count=1" \
        --machine-type=$INSTANCE_TYPE \
        --boot-disk-size=200GB \
        --metadata="install-nvidia-driver=True" \
        --preemptible
If you get an error saying:
ERROR: (gcloud.compute.instances.create) Could not fetch resource:
 - Quota 'GPUS_ALL_REGIONS' exceeded. Limit: 0.0 globally.
You need to adjust your GPU quotas.
- Go to Google Cloud Quotas Page.
- If you signed up with a free tier account, you first need to upgrade to a paid account; do so by clicking the “Upgrade account” button at the top right of the page. This won’t affect your $300 credit.
- In the “Limit Name” dropdown, select “GPUs (all regions)” and under “Locations” select “Global” (or “All locations”).
- Click edit quotas and select the quota to edit (GPUs All Regions). Set the new quota limit to 1 or more. Your request may require confirmation, which Google claims typically takes two business days to get.
You will have to wait a little bit until you see the text informing you the instance has been created. You can see the instance online here in your list of instances (note that this will be the page you have to go to later to stop your instance).
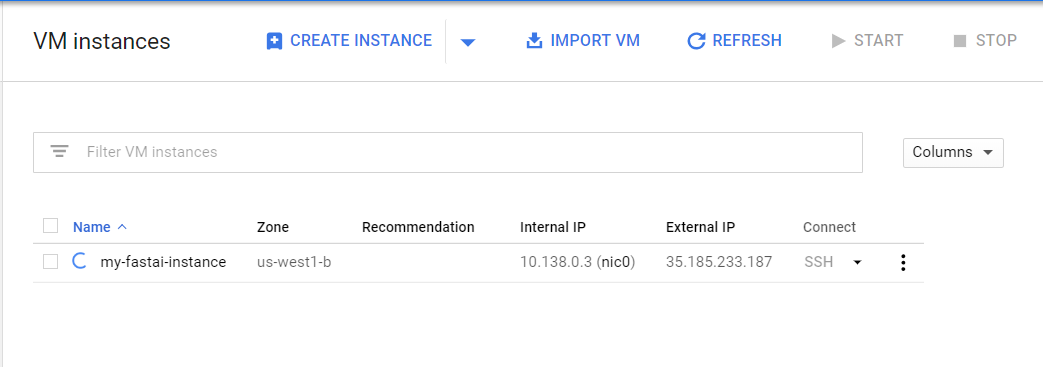
Your instance will be ready when the little icon to the left of its name turns green.

You can also read more details about instance creation from the command line here.
Once this is done, you can connect to your instance from the terminal by typing:
gcloud compute ssh --zone=$ZONE jupyter@$INSTANCE_NAME -- -L 8080:localhost:8080
Before you are able to connect, Google Cloud may ask you to create an SSH key. Just follow the prompts (the passphrase is optional, if you aren’t going to be using this key for anything too secure).
If everything went ok, you should now be connected to your GCP instance! To use it, simply go to localhost:8080/tree and you will find yourself in a jupyter notebook environment. Note that this only works while you maintain the ssh connection in your terminal. Note: GCP also installs a system called “JupyterLab”, which is still in beta, and doesn’t support everything in the courses; therefore, you need to use “Jupyter Notebook”, which is what the link above will take you to.
Preemptible instances:
Please note we are running a preemptible instance (notice the ‘–preemptible’ parameter in our command). A preemptible GCP instance is cheaper than traditional instances but it has two main disadvantages:
- It can be preempted (stopped) with a 30 second notice at any time due to high demand.
- It will always be stopped after 24 hours of continuous running.
If your instance is stopped, your saved data will be kept safe but if you are running a model, the progress will be lost.
These characteristics make preemptible instances a nice option for beginners, since you will not be running very deep models that take days to run. If however, you do need to run models without interruption for long periods of time, you can always call the same command but skip the ‘–preemptible’ parameter. Take into account this will increase your costs to about $1.29 an hour.
Step 4: Access fast.ai materials and update packages
Now your command line which should show a prompt along the lines of jupyter@my-fastai-instance:
You should make sure Github is configured and pull from the repository. You can do this by typing the following lines:
cd tutorials/fastai/course-v3
git checkout .
git pull
You should also update the fastai library:
conda install -c fastai fastai
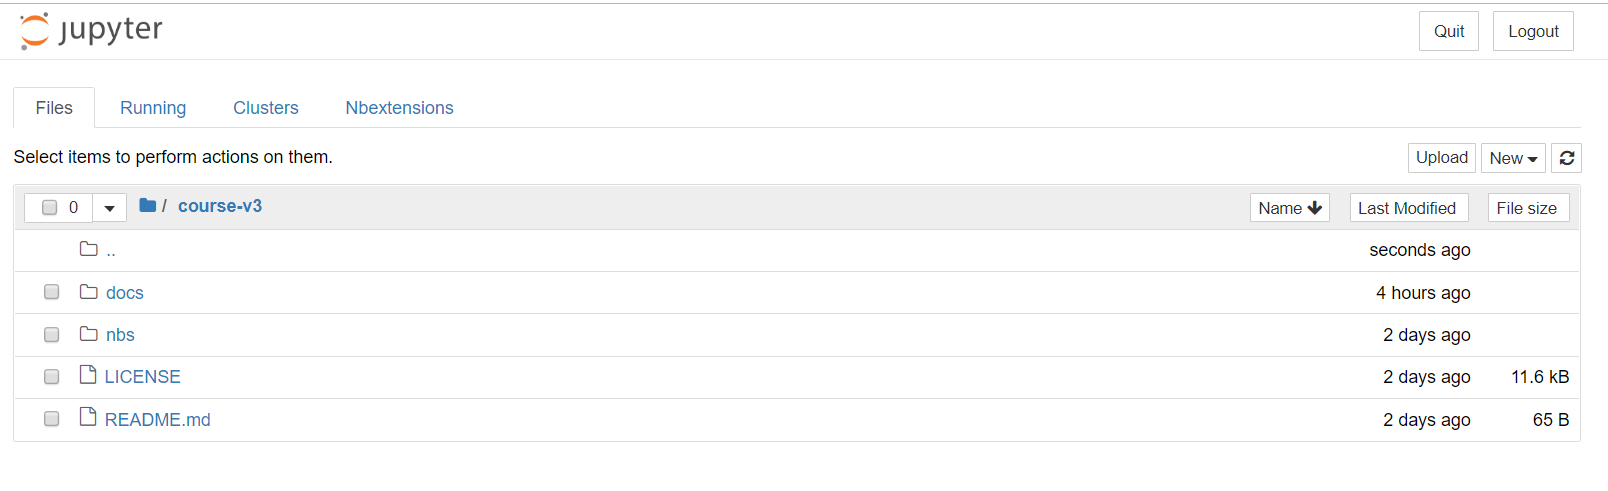
Next, from your jupyter notebook: click on ‘tutorials’, ‘fastai’, ‘course-v3’, and you should see something like this:
Now go back to the first page to see how to use this jupyter notebook and run the jupyter notebook tutorial. Come back here once you’re finished and don’t forget to stop your instance with the next step.
Step 5: Stop an instance
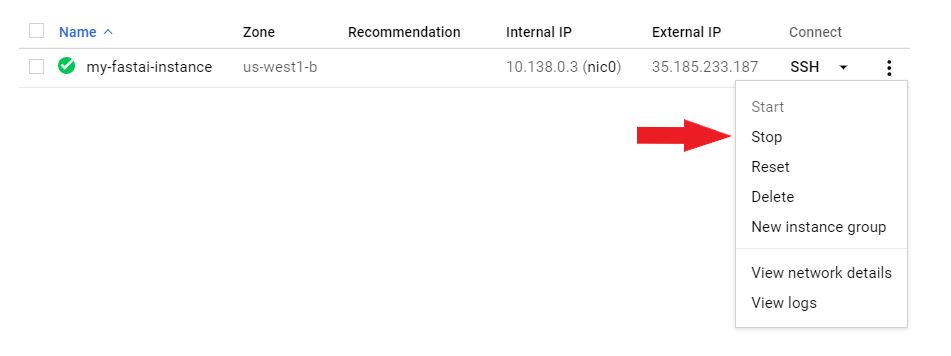
You will be charged if you don’t stop the instance while it’s ‘idle’ (e.g. not training a network). To stop an instance out of Google Cloud’s online interface go here, click the ‘…’ icon to the right of the instance and choose ‘Stop’ or click the stop button at the top of the screen.
To see how to open it again, update the course or the fastai library, go to the Returning to work page.
References
- Setting up PyTorch and Fast.ai in GCP
- Launching a PyTorch Deep Learning VM Instance
- Google Cloud SDK Quickstart for Debian and Ubuntu
- Using the Google Cloud SDK installer
- Installing the latest Cloud SDK version
- Installing Google Cloud SDK (StackOverflow question)
- GCP Error Quotas GPUs All Regions Exceeded(Stack Overflow question)
Many thanks to Marcel Ackermann, Antonio Rueda Toicen, Viacheslav Kovalevskyi, Francisco Ingham, and Jeff Hale for their contributions to this guide.