Welcome to Part 2: Deep Learning from the Foundations, which shows how to build a state of the art deep learning model from scratch. It takes you all the way from the foundations of implementing matrix multiplication and back-propagation, through to high performance mixed-precision training, to the latest neural network architectures and learning techniques, and everything in between. It covers many of the most important academic papers that form the foundations of modern deep learning, using “code-first” teaching, where each method is implemented from scratch in python and explained in detail (in the process, we’ll discuss many important software engineering techniques too). Before starting this part, you need to have completed Part 1: Practical Deep Learning for Coders.
The first five lessons use Python, PyTorch, and the fastai library; the last two lessons use Swift for TensorFlow, and are co-taught with Chris Lattner, the original creator of Swift, clang, and LLVM.
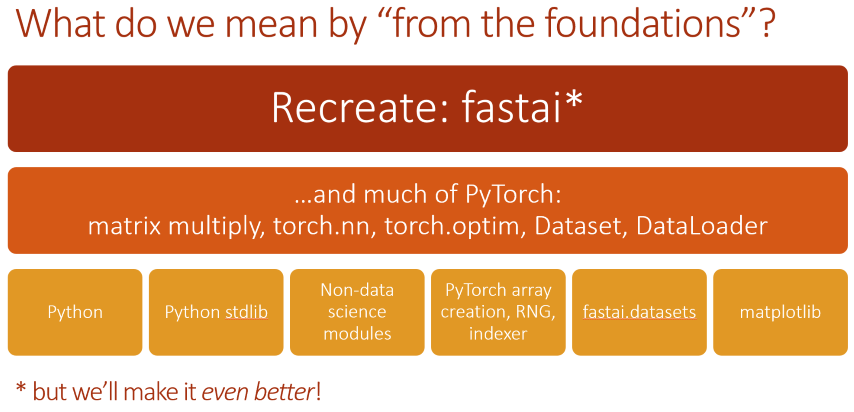
The purpose of Deep Learning from the Foundations is, in some ways, the opposite of part 1. This time, we’re not learning practical things that we will use right away, but are learning foundations that we can build on. This is particularly important nowadays because this field is moving so fast. In this new course, we will learn to implement a lot of things that are inside the fastai and PyTorch libraries. In fact, we’ll be reimplementing a significant subset of the fastai library! Along the way, we will practice implementing papers, which is an important skill to master when making state of the art models.
In the remainder of this post I’ll provide a quick summary of some of the topics you can expect to cover in this course—if this sounds interesting, then click on lesson 8 in the “Part 2” section of the sidebar over on the left. And if you have any questions along the way (or just want to chat with other students) there’s a very active forum for the course.
Lesson 8: Matrix multiplication; forward and backward passes
Our main goal is to build up to a complete system that can train Imagenet to a world-class result, both in terms of accuracy and speed. So we’ll need to cover a lot of territory.

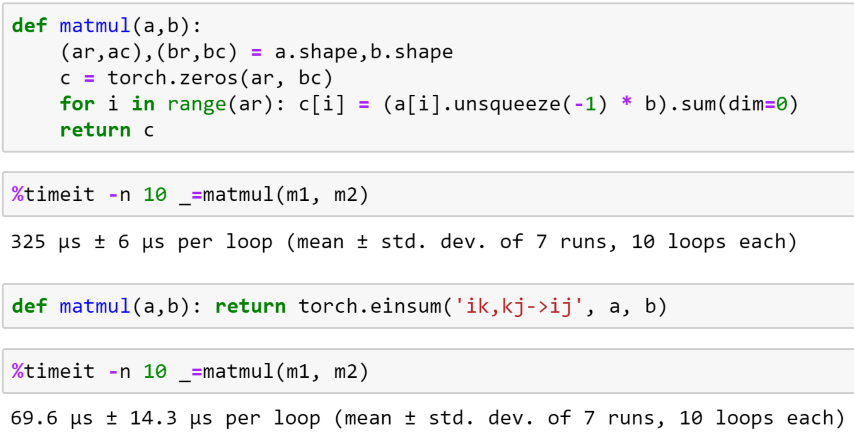
Step 1 is matrix multiplication! We’ll gradually refactor and accelerate our first, pure python, matrix multiplication, and in the process will learn about broadcasting and einstein summation. We’ll then use this to create a basic neural net forward pass, including a first look at how neural networks are initialized (a topic we’ll be going into in great depth in the coming lessons).
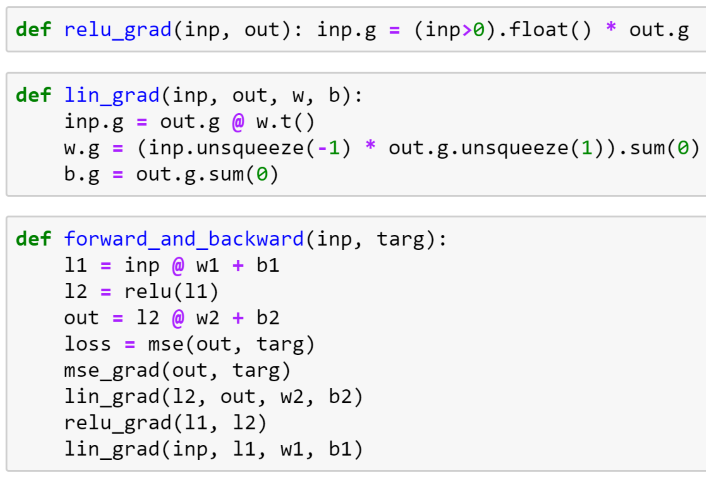
Then we will implement the backwards pass, including a brief refresher of the chain rule (which is really all the backwards pass is). We’ll then refactor the backwards path to make it more flexible and concise, and finally we’ll see how this translates to how PyTorch actually works.
Papers discussed
- Understanding the difficulty of training deep feedforward neural networks– paper that introduced Xavier initialization
- Fixup Initialization: Residual Learning Without Normalization – paper highlighting importance of normalisation - training 10,000 layer network without regularisation
Lesson 9: Loss functions, optimizers, and the training loop
In the last lesson we had an outstanding question about PyTorch’s CNN default initialization. In order to answer it, I did a bit of research, and we start lesson 9 seeing how I went about that research, and what I learned. Students often ask “how do I do research”, so this is a nice little case study.
Then we do a deep dive into the training loop, and show how to make it concise and flexible. First we look briefly at loss functions and optimizers, including implementing softmax and cross-entropy loss (and the logsumexp trick). Then we create a simple training loop, and refactor it step by step to make it more concise and more flexible. In the process we’ll learn about nn.Parameter and nn.Module, and see how they work with nn.optim classes. We’ll also see how Dataset and DataLoader really work.
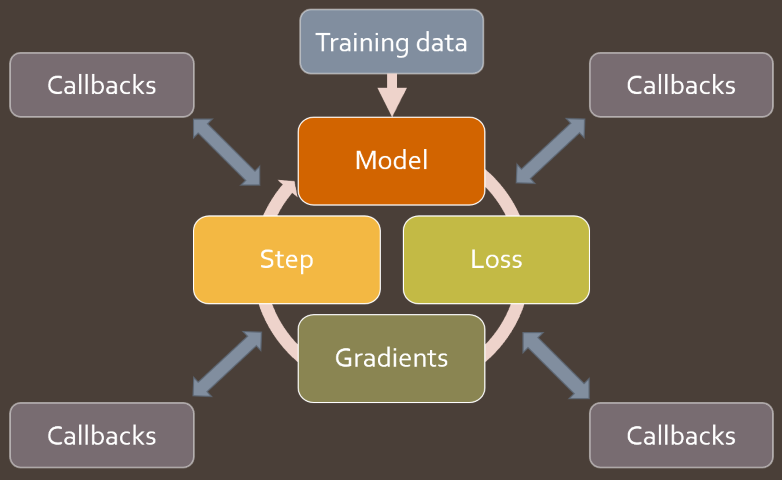
Once we have those basic pieces in place, we’ll look closely at some key building blocks of fastai: Callback, DataBunch, and Learner. We’ll see how they help, and how they’re implemented. Then we’ll start writing lots of callbacks to implement lots of new functionality and best practices!
Papers discussed
- Self-Normalizing Neural Networks (SELU)
- Exact solutions to the nonlinear dynamics of learning in deep linear neural networks (orthogonal initialization)
- All you need is a good init
- Delving Deep into Rectifiers: Surpassing Human-Level Performance on ImageNet Classification– 2015 paper that won ImageNet, and introduced ResNet and Kaiming Initialization.
Lesson 10: Looking inside the model
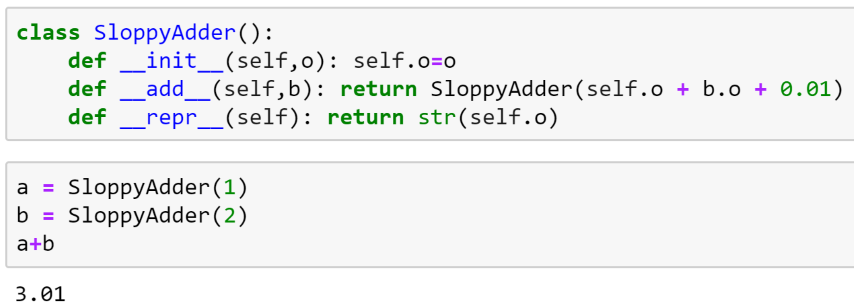
In lesson 10 we start with a deeper dive into the underlying idea of callbacks and event handlers. We look at many different ways to implement callbacks in Python, and discuss their pros and cons. Then we do a quick review of some other important foundations:
__dunder__special symbols in Python- How to navigate source code using your editor
- Variance, standard deviation, covariance, and correlation
- Softmax
- Exceptions as control flow
Next up, we use the callback system we’ve created to set up CNN training on the GPU. This is where we start to see how flexible this sytem is—we’ll be creating many callbacks during this course.
Then we move on to the main topic of this lesson: looking inside the model to see how it behaves during training. To do so, we first need to learn about hooks in PyTorch, which allow us to add callbacks to the forward and backward passes. We will use hooks to track the changing distribution of our activations in each layer during training. By plotting this distributions, we can try to identify problems with our training.

In order to fix the problems we see, we try changing our activation function, and introducing batchnorm. We study the pros and cons of batchnorm, and note some areas where it performs poorly. Finally, we develop a new kind of normalization layer to overcome these problems, compare it to previously published approaches, and see some very encouraging results.
Papers discussed
- Batch Normalization: Accelerating Deep Network Training by Reducing Internal Covariate Shift
- Layer Normalization
- Instance Normalization: The Missing Ingredient for Fast Stylization
- Group Normalization
- Revisiting Small Batch Training for Deep Neural Networks
Lesson 11: Data Block API, and generic optimizer
We start lesson 11 with a brief look at a smart and simple initialization technique called Layer-wise Sequential Unit Variance (LSUV). We implement it from scratch, and then use the methods introduced in the previous lesson to investigate the impact of this technique on our model training. It looks pretty good!
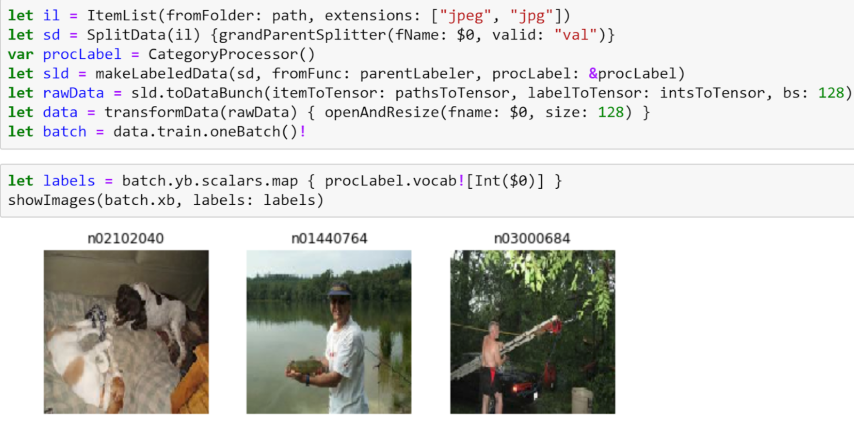
Then we look at one of the jewels of fastai: the Data Block API. We already saw how to use this API in part 1 of the course; but now we learn how to create it from scratch, and in the process we also will learn a lot about how to better use it and customize it. We’ll look closely at each step:
- Get files: we’ll learn how
os.scandirprovides a highly optimized way to access the filesystem, andos.walkprovides a powerful recursive tree walking abstraction on top of that - Transformations: we create a simple but powerful
listand function composition to transform data on-the-fly - Split and label: we create flexible functions for each
- DataBunch: we’ll see that
DataBunchis a very simple container for ourDataLoaders
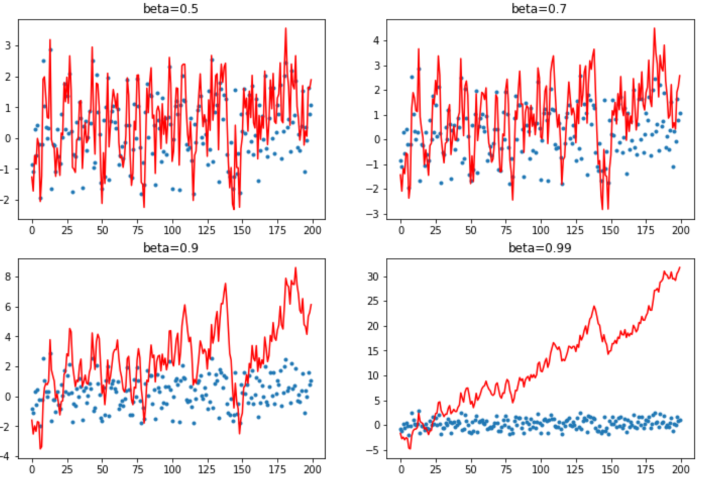
Next up, we build a new StatefulOptimizer class, and show that nearly all optimizers used in modern deep learning training are just special cases of this one class. We use it to add weight decay, momentum, Adam, and LAMB optimizers, and take a detailed look at how momentum changes training.
Finally, we look at data augmentation, and benchmark various data augmentation techniques. We develop a new GPU-based data augmentation approach which we find speeds things up quite dramatically, and allows us to then add more sophisticated warp-based transformations.

Papers discussed
- L2 Regularization versus Batch and Weight Normalization
- Norm matters: efficient and accurate normalization schemes in deep networks
- Three Mechanisms of Weight Decay Regularization
- Nesterov’s Accelerated Gradient and Momentum as approximations to Regularised Update Descent
- Adam: A Method for Stochastic Optimization
- Reducing BERT Pre-Training Time from 3 Days to 76 Minutes
Lesson 12: Advanced training techniques; ULMFiT from scratch
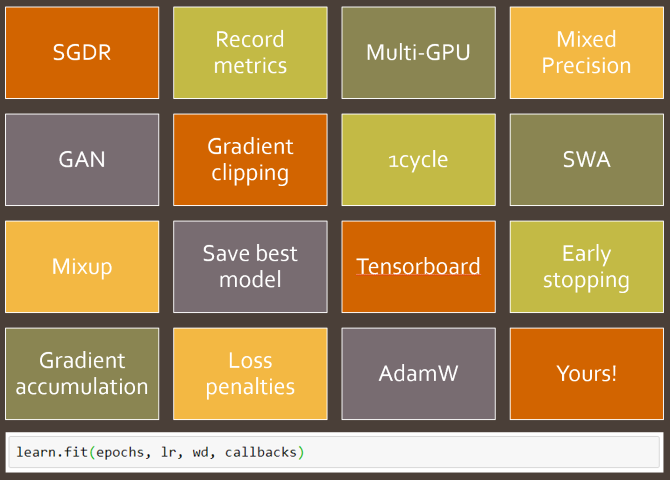
We implement some really important training techniques in lesson 12, all using callbacks:
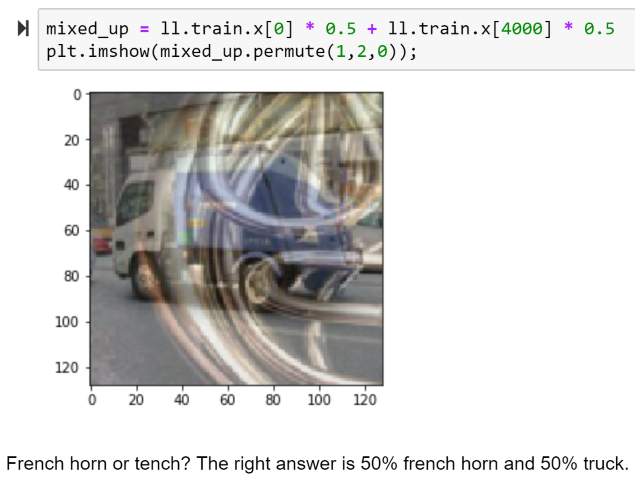
- MixUp, a data augmentation technique that dramatically improves results, particularly when you have less data, or can train for a longer time
- Label smoothing, which works particularly well with MixUp, and significantly improves results when you have noisy labels
- Mixed precision training, which trains models around 3x faster in many situations.
We also implement xresnet, which is a tweaked version of the classic resnet architecture that provides substantial improvements. And, even more important, the development of it provides great insights into what makes an architecture work well.
Finally, we show how to implement ULMFiT from scratch, including building an LSTM RNN, and looking at the various steps necessary to process natural language data to allow it to be passed to a neural network.

Papers discussed
- mixup: Beyond Empirical Risk Minimization
- Rethinking the Inception Architecture for Computer Vision (label smoothing is in part 7)
- Bag of Tricks for Image Classification with Convolutional Neural Networks
- Universal Language Model Fine-tuning for Text Classification
Lesson 13: Basics of Swift for Deep Learning
By the end of lesson 12, we’ve completed building much of the fastai library for Python from scratch. Next we repeat the process for Swift! The final two lessons are co-taught by Jeremy along with Chris Lattner, the original developer of Swift, and the lead of the Swift for TensorFlow project at Google Brain.
In this lesson, Chris explains what Swift is, and what it’s designed to do. He shares insights on its development history, and why he thinks it’s a great fit for deep learning and numeric programming more generally. He also provides some background on how Swift and TensorFlow fit together, both now and in the future. Next up, Chris shows a bit about using types to ensure your code has less errors, whilst letting Swift figure out most of your types for you. And he explains some of the key pieces of syntax we’ll need to get started.
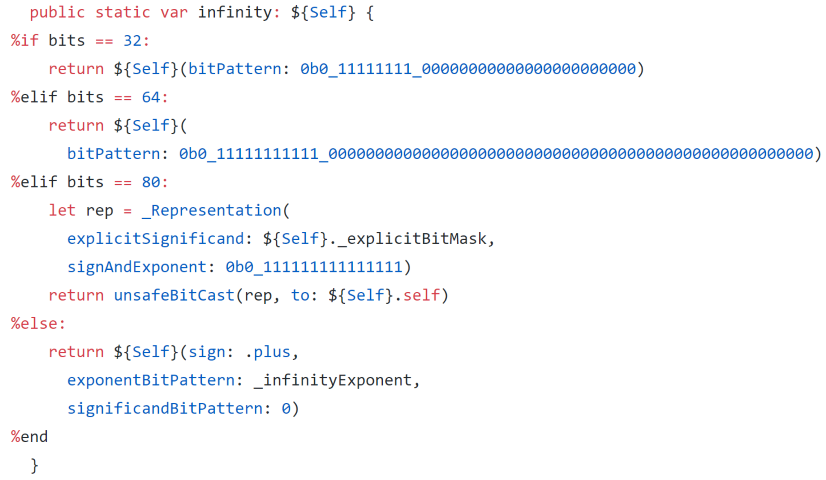
Chris also explains what a compiler is, and how LLVM makes compiler development easier. Then he shows how we can actually access and change LLVM builtin types directly from Swift! Thanks to the compilation and language design, basic code runs very fast indeed - about 8000 times faster than Python in the simple example Chris showed in class.
Finally, we look at different ways of calculating matrix products in Swift, including using Swift for TensorFlow’s Tensor class.
Swift resources
- The swift book
- A swift tour (download in playground on an iPad or a Mac if you can).
- The harebrain forum category. This is where to ask your S4TF questions.
- Why fastai is embracing S4TF?
Lesson 14: C interop; Protocols; Putting it all together
Today’s lesson starts with a discussion of the ways that Swift programmers will be able to write high performance GPU code in plain Swift. Chris Lattner discusses kernel fusion, XLA, and MLIR, which are exciting technologies coming soon to Swift programmers.
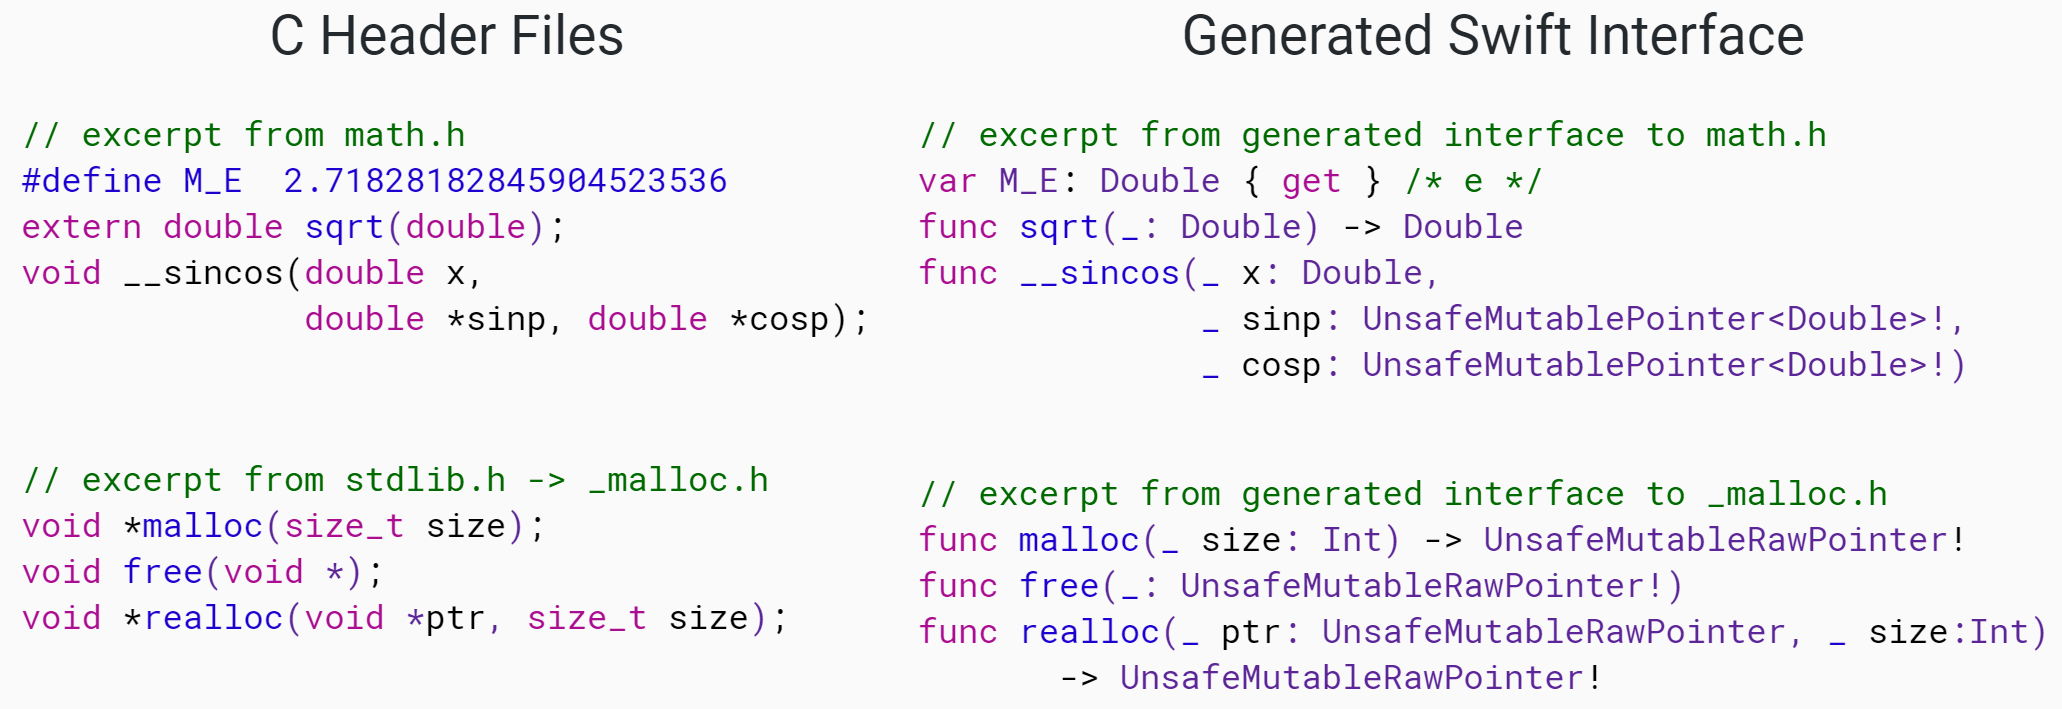
Then Jeremy talks about something that’s available right now: amazingly great C interop. He shows how to use this to quickly and easily get high performance code by interfacing with existing C libraries, using Sox audio processing, and VIPS and OpenCV image processing as complete working examples.
Next up, we implement the Data Block API in Swift! Well… actually in some ways it’s even better than the original Python version. We take advantage of an enormously powerful Swift feature: protocols (aka type classes).
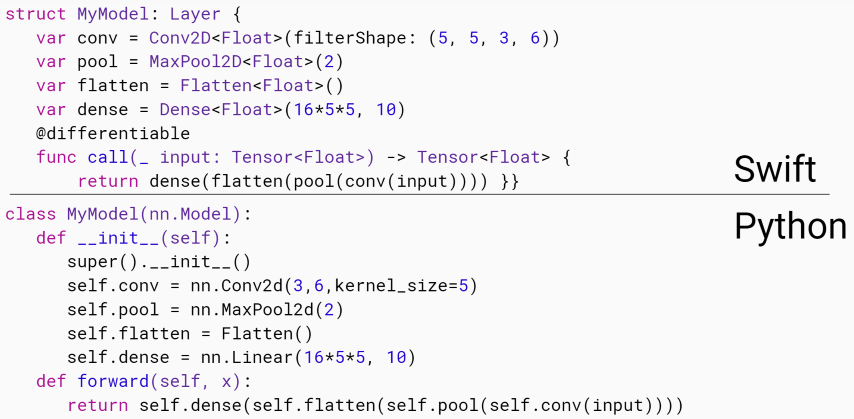
We now have enough Swift knowledge to implement a complete fully connect network forward pass in Swift—so that’s what we do! Then we start looking at the backward pass, and use Swift’s optional reference semantics to replicate the PyTorch approach. But then we learn how to do the same thing in a more “Swifty” way, using value semantics to do the backward pass in a really concise and flexible manner.
Finally, we put it all together, implementing our generic optimizer, Learner, callbacks, etc, to train Imagenette from scratch! The final notebooks in Swift show how to build and use much of the fastai.vision library in Swift, even although in these two lessons there wasn’t time to cover everything. So be sure to study the notebooks to see lots more Swift tricks…
Further information
- Skip the FFI: Embedding Clang for C Interoperability
- Value Semantics talk by @AlexisGallagher
- Tensor Comprehensions: Framework-Agnostic High-Performance Machine Learning Abstractions
More lessons
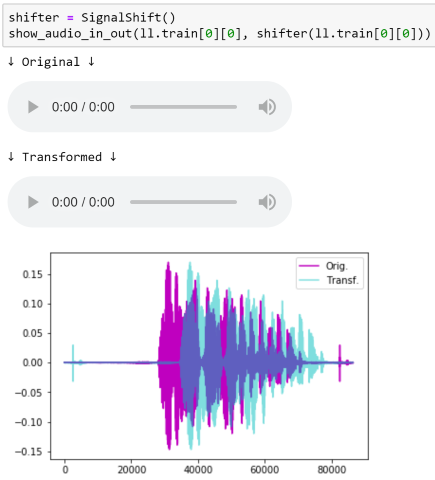
We’ll be releasing even more lessons in the coming months and adding them to an attached course we’ll be calling Applications of Deep Learning. They’ll be linked from the Part 2 course page, so keep an eye out there. The first in this series will be a lesson about audio processing and audio models. I can’t wait to share it with you all!